How to Shiny Hunt

PokéRadar Chaining (Gen IV, VIII, DPPt / BDSP)

Was That a Rustle or a Sparkle?

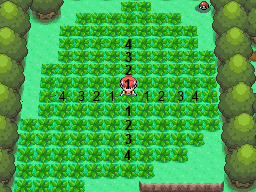
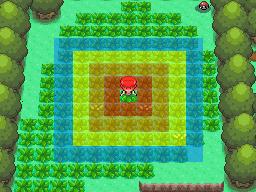
In the Sinnoh games (Diamond, Pearl, and Platinum from Gen IV, Brilliant Diamond and Shining Pearl from Gen VIII), the player receives an interesting Key Item called the PokéRadar after completing the regional Pokédex. This item serves two uses: finding Pokémon not in the original 'dex, and chaining Pokémon for increased odds of finding a shiny (you can even do both at the same time). When the Radar is used while in tall grass, four patches around the player will shake in one of three ways: slowly and subtly; quickly and violently; or sparkling, which indicates a Shiny Pokémon. (Quick note: in Gen IV, the patches only shake for a second or so, so you have to pay attention.) However, the odds of seeing a sparkling patch right away are still very low (each patch has the same shiny odds as a regular encounter when you first use it). So how can you increase your odds of finding a shiny Pokémon? You have to start a radar chain.

What does a radar chain mean? Well, when you step into a rustling patch, you'll start an encounter, and after you catch or knock out the Pokémon, four more patches will shake. If you step into the same kind of patch you used previously (quick/violent or slow/subtle), you'll most likely encounter the same Pokémon. Congratulations, you've started a radar chain! As long as it doesn't break and you keep lengthening the chain by getting more rustling-patch encounters, the odds of a shiny patch appearing will gradually increase until capping at 40 encounters with a whopping 1/200 odds in Gen IV and 1/99 in Gen VIII. So, your obvious priorities are to avoid breaking the chain during a shiny hunt, and keep pushing it further until you hit max odds (usually, we'll get to that later). How do you go about doing these things?

First, you want to find a decent-sized patch of grass with a mostly-complete 9x9 grid of grass tiles if you can. This image shows a great example, showing how much space you're looking for. Position yourself in the center, or as close to the center as you can, because the rustling grass tiles only appear in this 9x9 area, so you want to maximize how much space you can use.


As this image shows, there are four distinct rings around the player. When you use the Radar, the four patches of grass appear in these rings, one for each. Barring the first use, which can be started anywhere without breaking the chain (since it hasn't even started yet), you always want to step into the furthest tile, since the further the tile, the lower the chance of the chain breaking (ring 1 has a 72% chance of breaking, ring 2 has a 52% chance, ring 3 has a 32% chance, and ring 4 has a 12% chance). Also, as stated before, make sure you step into the same type of rustling patch, since if you change patch-types, you'll most likely break the chain.

A few important points: First, whenever you start a chain, use a Repel and lead with a high-level Pokémon, since random encounters break the chain; Repelling prevents these encounters from interfering. Second, it's preferred to catch the Pokémon in the chain instead of knocking them out, since catching directly subtracts a 10% chance for the chain to break (R1 becomes 62%, R2 becomes 42%, R3 becomes 22%, and R4 becomes a mere 2% chance to break if you caught the previous Pokémon). Third, make sure to avoid accidentally stepping into a patch on your way to your desired patch; in particular, don't walk straight up, as a patch can appear directly behind you (I've lost a few 30+ chains this way).

Finally, and perhaps most importantly, if you don't like the patch generation (i.e. the ring-4 patch is the wrong type), you can reset it by using the Radar again to re-generate the patches. Keep in mind, however, that the Radar can only be used after walking for 50 tiles, so if you need to walk between the rustling patches to recharge the Radar, don't be afraid to do so as long as you keep your Repel active. Doing so does remove the 10% chain-break reduction from catching, but since a non-boosted ring 4 patch is still less likely to end a chain than a boosted ring 3 patch, it's generally worth the risk.